Increase Cycling Average Speed: Tires, Aero & Route | Velo-Perso
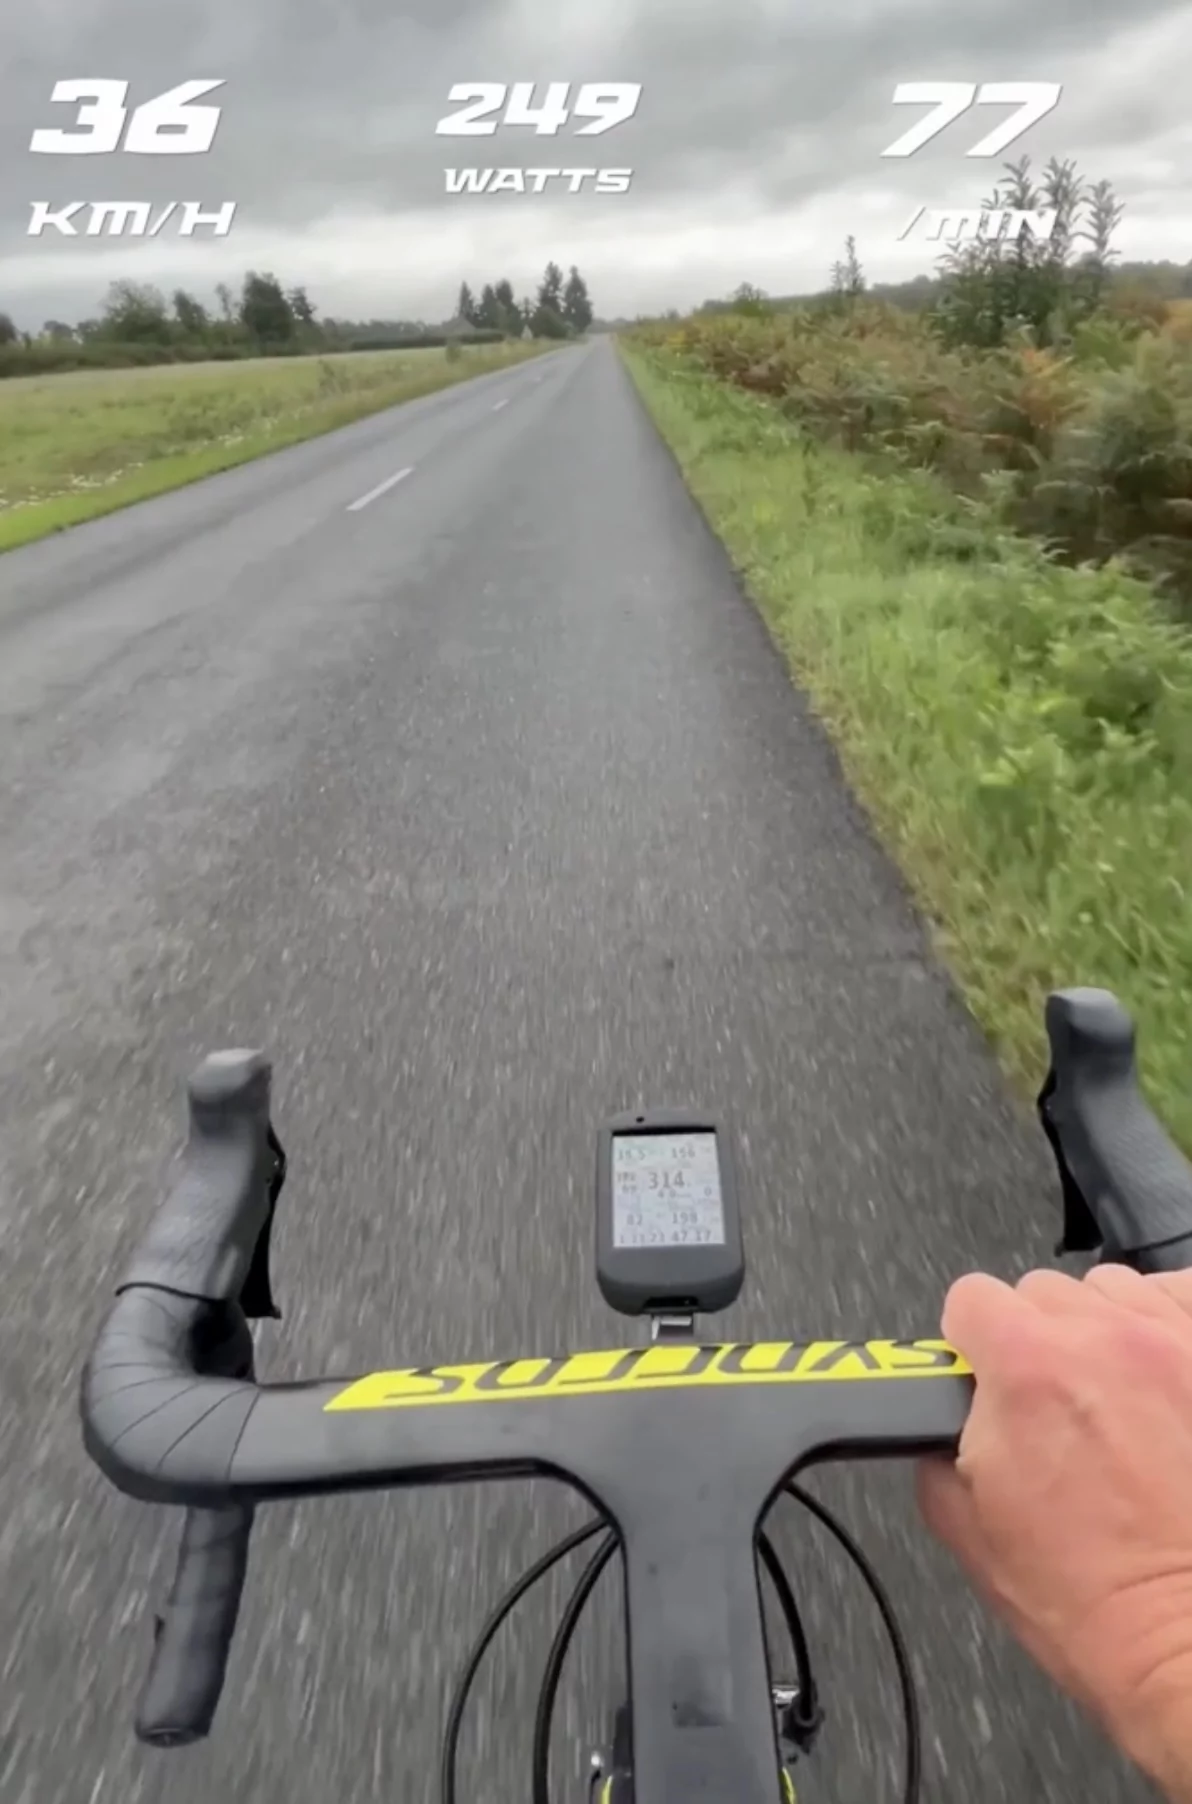
POV: cycling at 35kph with backwind
How to increase your average cycling speed
Average speed matters to every cyclist—from beginners to amateur racers and even pros.
It’s a rewarding metric that reflects both the joy of riding fast and your performance level.
This page gives you concrete tips to gain km/h—whether your goal is steady progress or impressing your riding buddies.
Key idea: there are two types of gains — immediate gains you can grab on your next ride, and long-term gains built with optimized equipment and better pacing.
1. What drives average speed
Riding fast depends on several factors:
– aerodynamics (the main lever above ~30 km/h),
– tire rolling resistance,
– weight (especially uphill),
– route choice,
– pacing and wind management.
2. Tires: a key part of efficiency
Rolling resistance is the same solo or in a bunch. In a group, aero drag drops, so rolling matters proportionally more.
As a rule of thumb, a good tire costs ~8 W, but you can quickly reach ≈12 W per tire if it’s worn, poorly inflated, or the wrong model.
Dropping to 6–7 W is possible, but often at the expense of robustness (higher puncture risk).
At 32 km/h, two riders of similar build can show a 40 W difference purely from position. Optimizing aero is crucial. Focus on:
– a more compact position (appropriate crank length, well-set bar/stem),
– a snug jersey and bibs,
– a modern wind-tunnel-tested helmet,
– validated aero accessories (e.g., overshoes).
Cockpit setup is, in our view, the most critical point for aero gains on a modern road bike. A bike fit will deliver comfort and geometry for your body;
however, for sportive riders, pure aero is sometimes underweighted (aiming for 6 h comfort vs. a few dozen watts saved). You need to pick the right comfort ↔ aero trade-off.
Practical levers: adjust bar height (spacers / steerer cut if validated), stem length, and bar width.
Pros sometimes ride smaller frames with longer stems and very low bars. Without going extreme, note that—same level and geometry—tests show ~2–5 W saved at 45 km/h in favor of the smaller size.
If you are 50/50 between two sizes, lean toward the smaller.
On bar width: 42 cm used to be standard, but since ~2018 the pro peloton has moved narrower. A realistic, effective target is 38 cm
(allow a few thousand km to adapt). Pair with well-cut aero textiles and quality overshoes (e.g., Spatzwear Windsock 2 / FASTA-Lite for winter).
Velo-Perso’s take: on solo rides between 30 and 35 km/h, the gains from oversized pulley cages,
Rotor cranksets (e.g., 165 mm), or other aero add-ons are marginal
compared with route choice, position, and fitness. They shine at higher speeds (TT, non-draft tri) or when every second counts.
4. Pick the right route
A fast route is first a no-brakes route: wide, priority roads, low traffic, pedaling almost nonstop.
Flat areas: ride out into headwind in sheltered zones (forest), come back on exposed roads with tailwind.
Rolling/mid-mountains: climb into headwind in a narrow valley, return along the ridges with tailwind.
High mountains: watch out for thermal winds building through the day; pick the right hours. Some (especially cross-border) passes can be brutal… or help you record big averages if you place exposed sections with a tailwind.
Rolling countryside: define a “booster” section to hold 20 minutes at FTP with no stops or crossings—ideally slightly downhill and tailwind-exposed. Beyond raw speed, this teaches you to ride fast—useful in bunch rides and cyclosportives.
Velo-Perso.com onboard camera — Return on a straight, fast-rolling road with low traffic, and a tailwind.
Context: slight uphill (false flat), favorable conditions to hold speed.
Observed pace: ~35 km/h for ~250 W (order of magnitude).
Why a power meter helps:smooth your effort, press harder when it makes sense, avoid surges.
Practical tip: steady cadence (≈85–95 rpm), eyes up, anticipate small gradients to keep momentum.
5. Pacing on the day
To target a higher average speed:
Avoid long stretches at low speed.
Don’t go into the red before a fast section.
Ride around your FTP on the fast parts.
Recover slightly on very fast sections so you can re-accelerate at the right moment.
Crest short climbs hard to keep speed rolling.
Use Strava for benchmarking: create two standard loops (North/South) you repeat through the year depending on wind.
Example: “Loop 1: 2 h at 30 km/h” — ride it 5 times in the year at the same target speed and record the watts required each time.
That way you track your efficiency (W ↔ km/h) with comparable gear and conditions.
Riding fast doesn’t always equal a higher level. Your power-duration curve and VO2max are far more reliable indicators.
That said, chasing a high average is an excellent drill in pacing and big-gear work.
Conclusion
To lift your average speed, focus on three pillars: tires, aero, and route + pacing.
Gains add up—and the sum of small details makes a big difference.
Why does Velo-Perso offer ceramic BBs, bearings, cages and pulleys if the solo gain is only one star?
Because they become highly effective once the prerequisites are in place (position, route, fitness). A poor aero setup can cost −50 W — nothing will offset that.
But once aero is optimized, low-friction parts really show their value: in the mountains (lower speeds), in time trials (every second counts), and for long-term smoothness/durability.
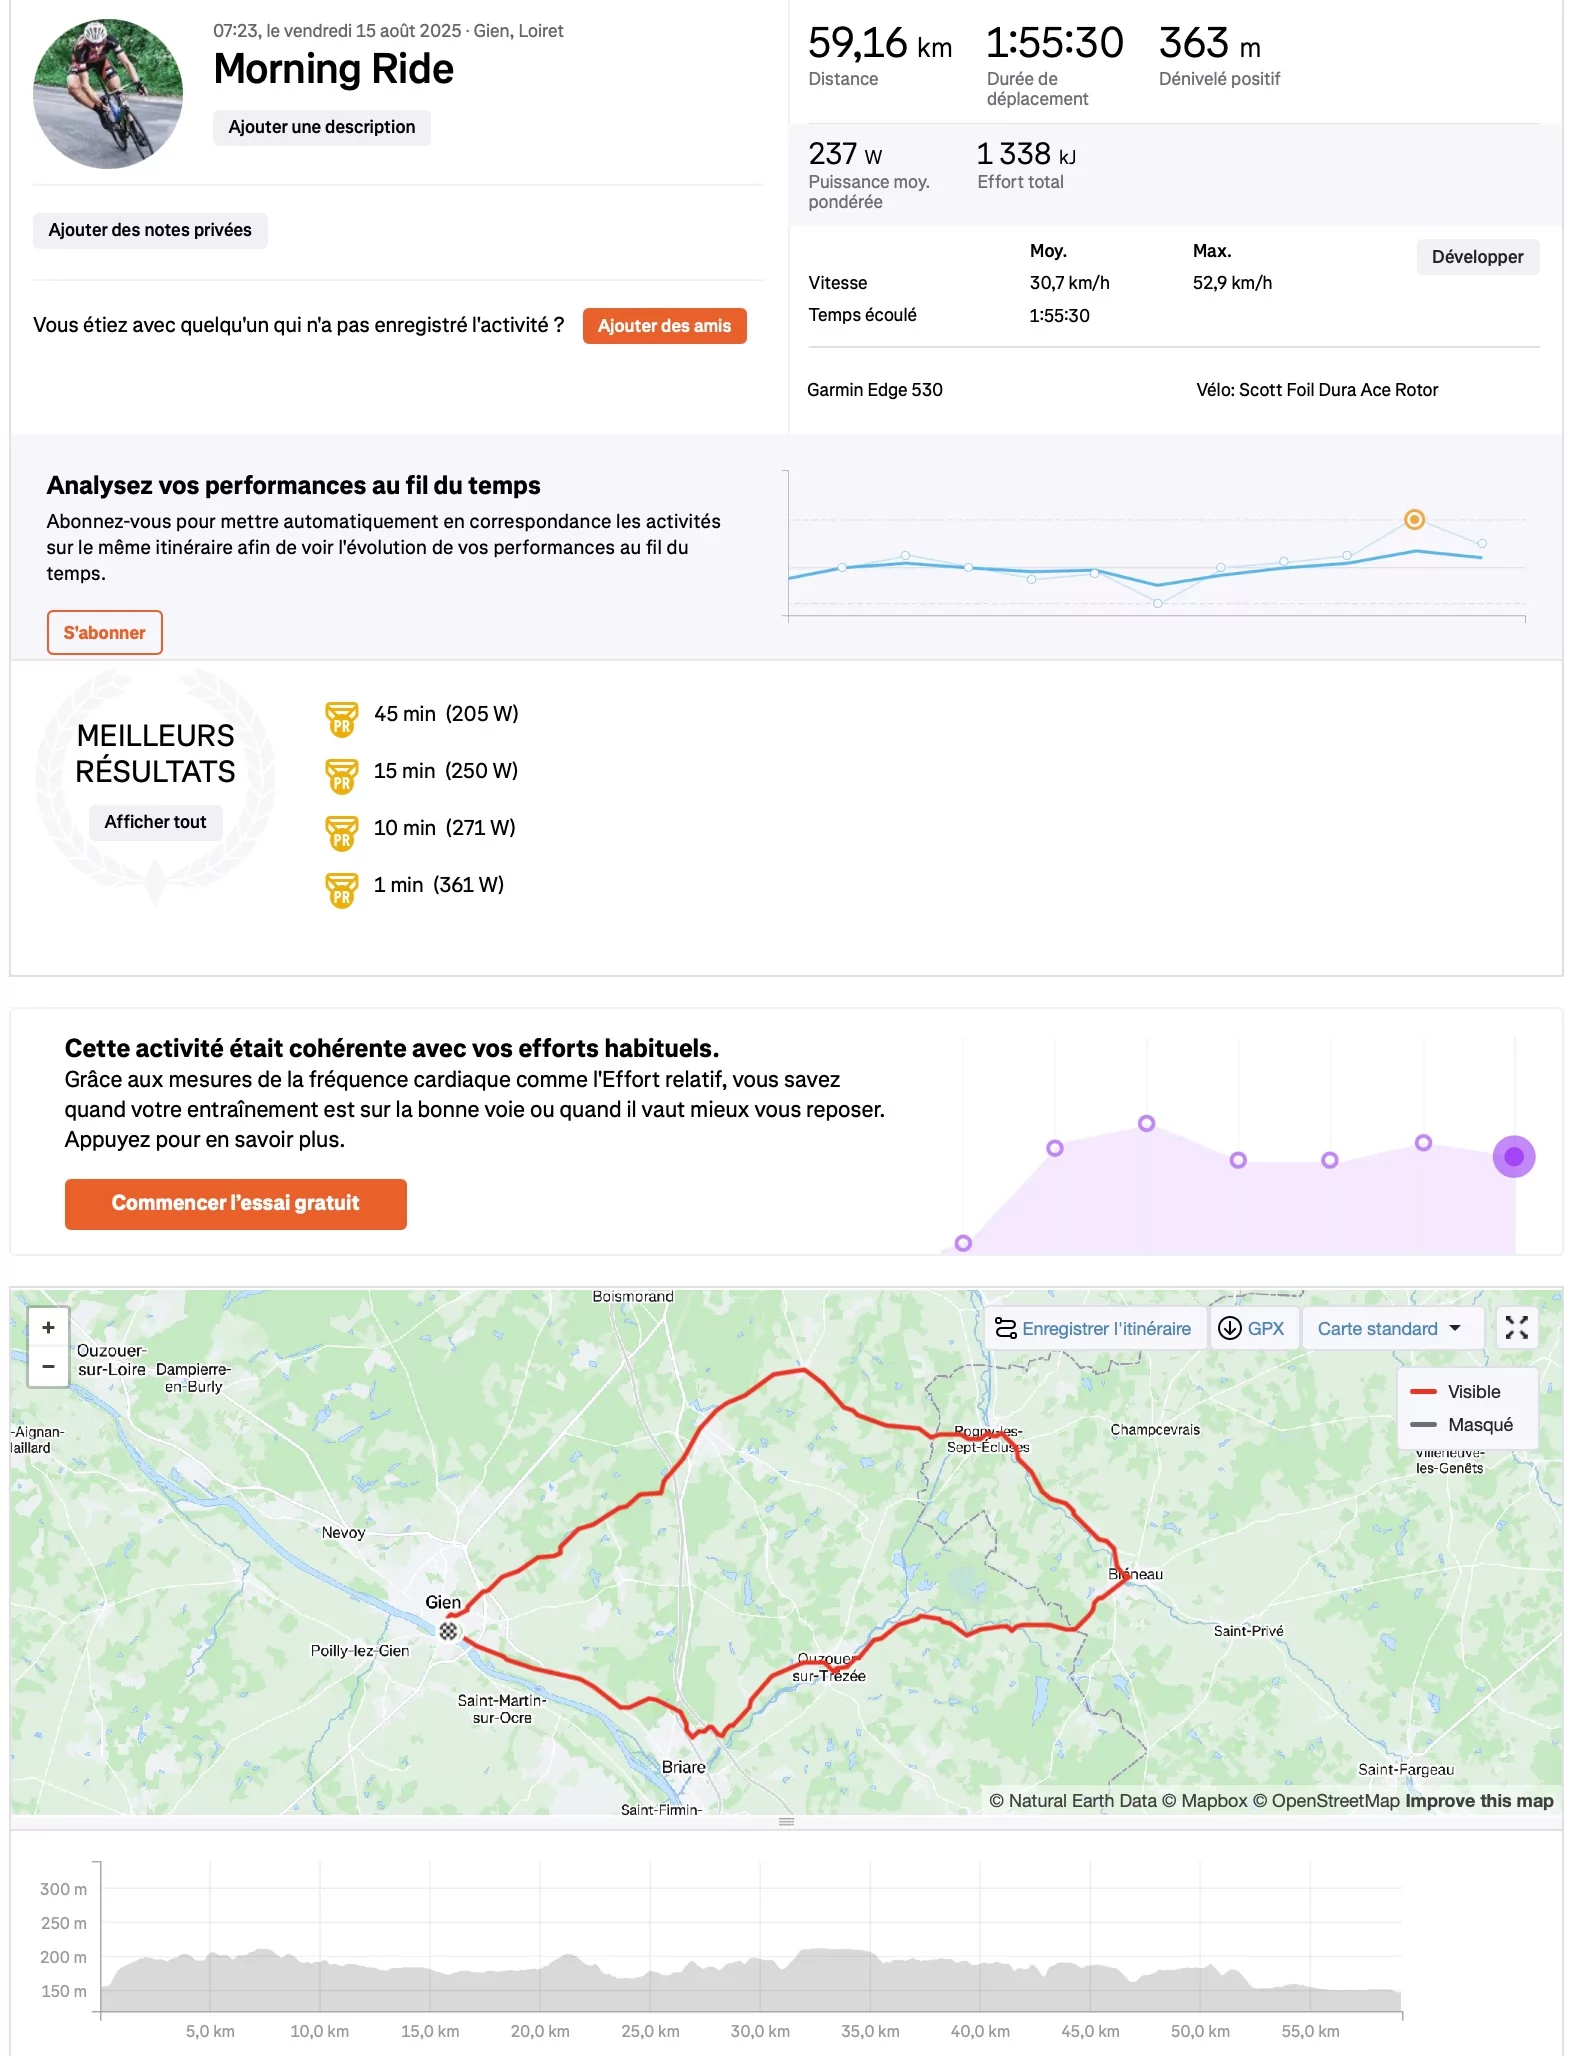
Strava example: 59 km route optimized for a north-easterly wind
This route is designed to minimize headwind cost and maximize tailwind sections.
It consists of four complementary segments for a total of 59 km.
How to read the map: the outbound leg uses sheltered forest lanes then an enclosed valley;
the return leverages more open, faster roads with a tailwind.
Segment
Distance
Wind
Road type / Exposure
Target intensity
Target speed
Goal
A — Outbound 1
22 km
Headwind (NE)
Small forest roads, strong shelter
Zone 2 (endurance)
≈ 28 km/h
Limit power drift into the wind
B — Outbound 2
8 km
Headwind (NE)
Fast main road, enclosed valley (low exposure)
Stable Z2
≈ 28–30 km/h
Preserve freshness before the return
C — Return 1
20 km
Tailwind (NE)
Fairly fast open road, exposed
Z2 → Z3 if comfortable
≈ 35–38 km/h
Fully exploit wind assistance
D — Return 2
9 km
Tailwind (NE)
Busy main road, valley (favorable)
Controlled Z2–Z3
≈ 35–38 km/h
Hold speed, extra safety awareness
Total
59 km
Pacing plan: Z2 at ~28 km/h into headwind · 35–38 km/h with tailwind (depending on fitness & surface)
Practical tips
Timing: in rolling/high-mountain areas, start early to avoid thermal winds.
Safety: segment D is fast but busy — keep right, use a rear light, be cautious at access points.
Efficiency tracking: log your watts on segments A+B (headwind) to monitor Z2 at fixed speed.
Traffic alternative: if D is too busy, plan a quieter parallel variant even if slightly slower.
FAQ — Average cycling speed
Quick questions to recap the essentials. Open each item for the answer.
How many watts do I need for 30, 35 or 40 km/h?›
Ballpark figures (solo, decent position, no strong wind): ~180–200 W for 30 km/h, ~220–260 W for 35 km/h, ~300–350 W for 40 km/h.
This varies a lot with CdA, wind, altitude and road surface.
Which tires should I choose to improve average speed?›
Aim for ~8 W of rolling resistance per tire; above ~12 W (worn tire / wrong pressure) your average will drop.
Dropping to 6–7 W exists but is often less robust.
Compare models on Bicycle Rolling Resistance.
Tire pressure: how should I set it?›
Follow the maker’s range (tire width/rider mass/surface) and avoid overinflating.
Adjust in 0.2–0.3 bar steps for comfort and grip; too much pressure can increase losses on rough tarmac.
Does position matter more than weight for average speed?›
Yes above ~30 km/h: it’s easy to see ~40 W difference at 32 km/h from position alone.
Work on cockpit setup (bar/stem height), a snug kit, and an aero-tested helmet.
Narrow handlebar: is it worth it for aero?›
Yes—pros have trended narrower since 2018. A realistic target is ~38 cm (allow time to adapt).
Pair with aero overshoes (e.g., Spatzwear Windsock 2).
How do I pick a fast route when it’s windy?›
Put the outbound leg into headwind on sheltered roads (forest/enclosed valley) and the return with tailwind on open, fast roads.
In the mountains, start early to avoid thermal winds. See our Strava example above.
What target paces for headwind and tailwind?›
Typical solo example: Zone 2 ≈ 28 km/h into headwind on sheltered roads, and 35–38 km/h with tailwind on fast roads—depending on fitness and surface.
Are ceramic bearings/OSPW cages useful?›
They’re marginal gains for solo riding at 30–35 km/h, but helpful at TT/high speeds, in the mountains (smoothness), and for durability—once position/aero are optimized.
I don’t have a power meter: how can I improve?›
Create 1–2 benchmark loops (North/South) and repeat at a fixed target speed, logging conditions and heart rate.
A power meter makes it easier to smooth your effort and track progress:
our guide.
Which accessories help without going full skinsuit?›
A well-cut jersey, snug bibs, aero overshoes and a wind-tunnel-tested helmet.
Start with clothing before chasing tiny component gains.